博大是学运活跃的学校,而我的学校并非涉及任何政府和非政府的运动,原因是我们都采取低调的生活。得过且过不关心社会和国家课题。就连学生福利,我们都不大理睬,只要没有威胁到我们。
可以说开心没有担忧的大学生生活,但是好景不常在,有些大学生或官员采取霸道手段处理事情已经
到不能忍受了的地步了。今年2009,AUKU最新的PINDAAN所采取的纪律行动是什么?
或许很多人不知道,那就是停学,和转移成为法庭案件。学校可以将他们不满意的事件以这样的手法解决掉,而且这种情况大都是对学生不利。就算法庭宣判无罪,但是大学生涯已经是被判死刑了。
大学生没有必要受到这种恐吓,在没有选择之下,只有走上学运,得到那些正义的人士支持,这是一种心灵支持,当一个人绝望和失望时,无助和害怕时就是需要这些东西协助。
相信很多人不解为何北大会为了巴士事件闹上媒体,博大欺负学生上媒体,我的学校会因为“黄洁冰”事件也上媒体。当然在这里不便透露太多。就像以前强奸案,为了避免消息传出去,他们采取金钱,学位和压力打压。对于一个没有政治背影的人,是受不了这种压力的。
Sunday, April 26, 2009
Monday, April 6, 2009
Creating Animations in PS/ImageReady
|
I'm writing this tutorial with PS CS (8). If you are using another version of PS, your screenshots may look a bit different, but the instructions will be fine for you. Animations work much the same in PS/ImageReady as they do in PS Elements 2, only they are actually a bit easier to do in Elements. Again, if you have Elements, follow along here to see how they work. I'll have a tip for you about how Elements differs. | ||
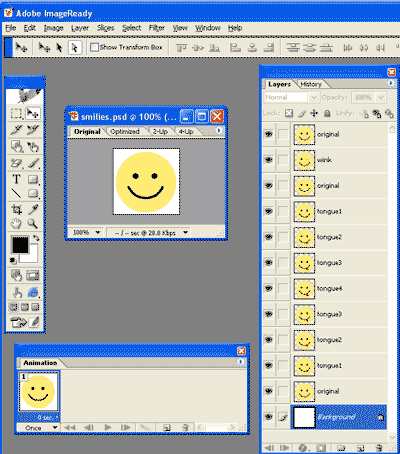
| Graphic animations are like short movies. We generally make these in either Flash (swf) or as animated GIF. Here we will work in Photoshop and ImageReady to make an animated GIF. Like movies, animations are made of frames, and you make these frames as layers in Photoshop. Of course anything can be animated, but I'm going to make an animation out of this smiley, creating the somewhat sassy character in my header. Let's go! 1. Begin by making the base image on a separate layer from the background. | 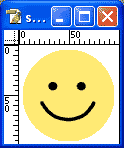 | ||
| 2. Make several copies. Because we're going to base each of the frames upon this image, make several copies of this layer. (I ended up ultimately with 10 frames, all based upon this layer. |  | ||
| 3. Create all the different frames... as layers. Turn off the visibility eyes for all but the next to the bottom layer. Then begin at the bottom layer and work your way upward, making each of the frames onto its own layer. 4. Label each layer as you go along. This makes it easier to see what each layer does. If you want to have the same frame repeating, you can copy this frame by duplicating its layer and then moving it wherever you want it in the layers palette. | 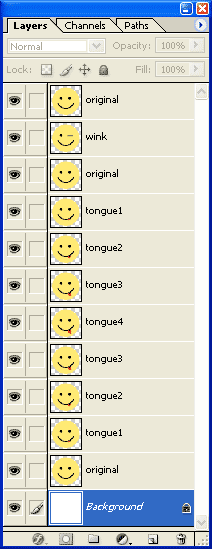 | ||
| Ok.. This next part is where Elements users have a different, much more straight-forward procedure. Instead of jumping to ImageReady, Elements Users, JUMP down to the note at the end of this tutorial! 5. Photoshop Users.. proceed. Now we are going to Jump to ImageReady. Ready... set.... Jump! Click the Jump to ImageReady bar at the bottom of your Toolbox. This opens ImageReady! |  | ||
| |||
| 7. Making the animation background transparent. Let's make our animation so that the background is transparent, too. To do this, begin by turning off the visibility eye on the background layer. 8. Show only the layer for the first frame. Next, we will put each of our frames into the animation palette. Notice that the first frame already has an image in it. We have to make it the image we want, though, so go on and turn off all the visibility eyes except for the bottom layer. There. that's the first frame. | |||
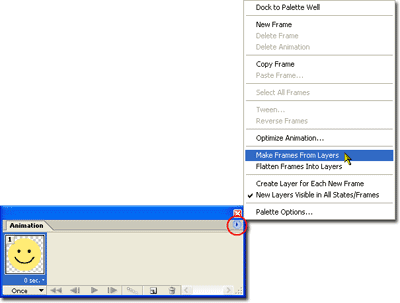
| 9. a. Making the rest of the frames. There are at least a couple of ways of going about this. If you have all of your layers carefully set up, as I do here, with one layer for each frame, you can use the handy little flyout arrow in the Animations palette and choose Make Frames from Layers. (See next image below.) Tada! Done! Head on down to Step 12. If you have some image elements on different layers, though, you may want to do the "Brute Force Method." I go through this in steps 9 - 11. | |||
 | |||
| 9. b. Make the second frame. Now click the New Frame icon at the bottom of the Animations palette. (red arrow at right) This makes a new frame. |  | ||
| 10. Show the layer for the second frame. Make this frame look like you want by turning on the visibility eye for the next layer up. For my animation, this was the layer I called tongue1. |  | ||
| 11. Making all the frames Now you sort of get into a rhythm -- new frame.. show layer... new frame... show layer... till your layers are all visible and one is in each of your animation palette's frames. |
| ||
 | |||
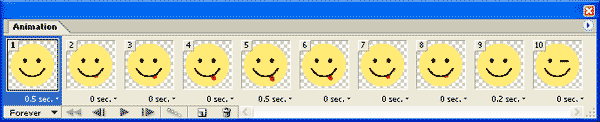
12. Time to set up the timing!
|  | ||
| Now to try it out and tweak as necessary. You will do all the tweaking in the Animations palette, but you will preview what it looks like in the image window. 13. Try out and Tweak Hit the Play button. It's the single triangle that points to the right. As you hit it, keep an eye on your image window and maybe even cover up your animations palette, if you find it distracting. The image at the right came from the settings in the animation palette just below. (Remember that extraneous frame 11 that I'd made and decided I did not need? Click it to select it and then hit the Trashcan at the bottom of the Animation palette. Gone!) | |||
 | |||
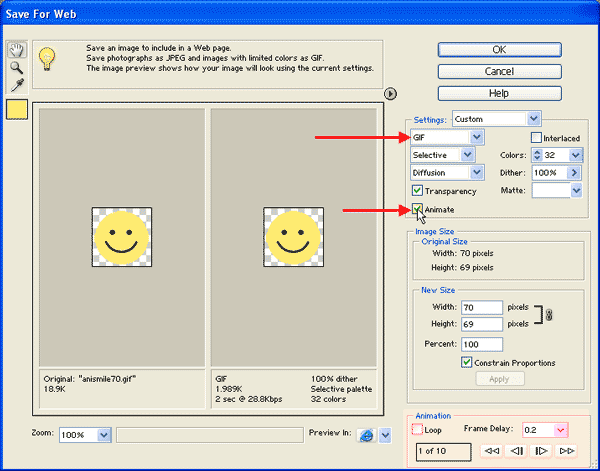
| 14. Changing the size of the image You change your image size in Edit > Image Size unless you already had the size you wanted in Photoshop. If you reduce the size in ImageReady, though, don't forget to UNDO this before you save your file. 15. Optimizing the animation. In your image window, you have 4 tabs, kind of like the Save for Web dialog box in Photoshop. Choose Optimized if you want to see how your optimization settings make your image look. Widen your window a bit and you can click the dropdown to see how large your filesize is at these settings. | 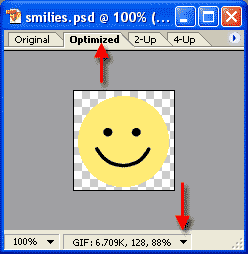 | ||
| 16. Changing Optimization Settings. If you need to have different optimization settings, you can change them in the Optimize palette. (Window > Optimize if you can't see it) | 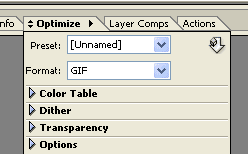 | ||
| 17. Saving the Animation. This isn't quite as tidy, imho, as File > Save for Web, because you don't get all the nifty image sizing and optimization controls right there. Nay, you have to do all these ahead of time. But at least saving the animation is just a one-step process. File > Save Optimized as... and name your file! | |||
| 18. Try out the animation! You can preview an animation in ImageReady, as you just did, but you can also view it in your browser. In Internet Explorer, go to File > Open ... Change your file type to All files, and find your file. Hit Open and you should be able to see your animation! | 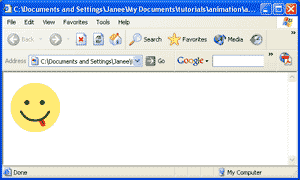 | ||
| |||

Thursday, April 2, 2009
音乐考试
这个星期三,1-4-2009也是愚人节,被人玩弄了半个小时,原本课堂取消的,不懂哪一个人向我们开玩笑。事先不通知,来一个惊喜,说等下讲师迟半个小时进讲堂,等下有小考,先读第4第5
课。
结果很多人临时抱佛脚,在讲堂里努力半个小时,结果是一个愚人节的开玩笑。
下午有音乐考试,也是最后一堂音乐课,讲师评分时,怀疑我有钢琴基础,哈哈其实我只是懂皮毛。这次他猜错了。
之后有大演奏,也有拍摄,不懂拍摄结果怎么样,这个是大学宣传摄影。结果回到宿舍时已经是8点,因为下大雨,回不到宿舍。
课。
结果很多人临时抱佛脚,在讲堂里努力半个小时,结果是一个愚人节的开玩笑。
下午有音乐考试,也是最后一堂音乐课,讲师评分时,怀疑我有钢琴基础,哈哈其实我只是懂皮毛。这次他猜错了。
之后有大演奏,也有拍摄,不懂拍摄结果怎么样,这个是大学宣传摄影。结果回到宿舍时已经是8点,因为下大雨,回不到宿舍。
最近比较忙
今天presentation总算完结了,只是美中不足的地方是,我们没有spectrum analysis,所以教授要求明天呈交给他关于spectrum analysis的报告。
我的组员有五个人,全部来自不同大学和学院,还有一个是通讯系。虽然时间不到一天,需要完成这个不可能的任务,但是相信应该做得到的。
虽然不懂自己在做什么,但是肯定在通讯工程里学到一些皮毛。这也对未来电子工程系的建立了一个新的领域,就是使用无线通讯。
我的组员有五个人,全部来自不同大学和学院,还有一个是通讯系。虽然时间不到一天,需要完成这个不可能的任务,但是相信应该做得到的。
虽然不懂自己在做什么,但是肯定在通讯工程里学到一些皮毛。这也对未来电子工程系的建立了一个新的领域,就是使用无线通讯。


Subscribe to:
Posts (Atom)